Documentation
Use this document as a way to quickly get started with LinkMap
Table of Contents
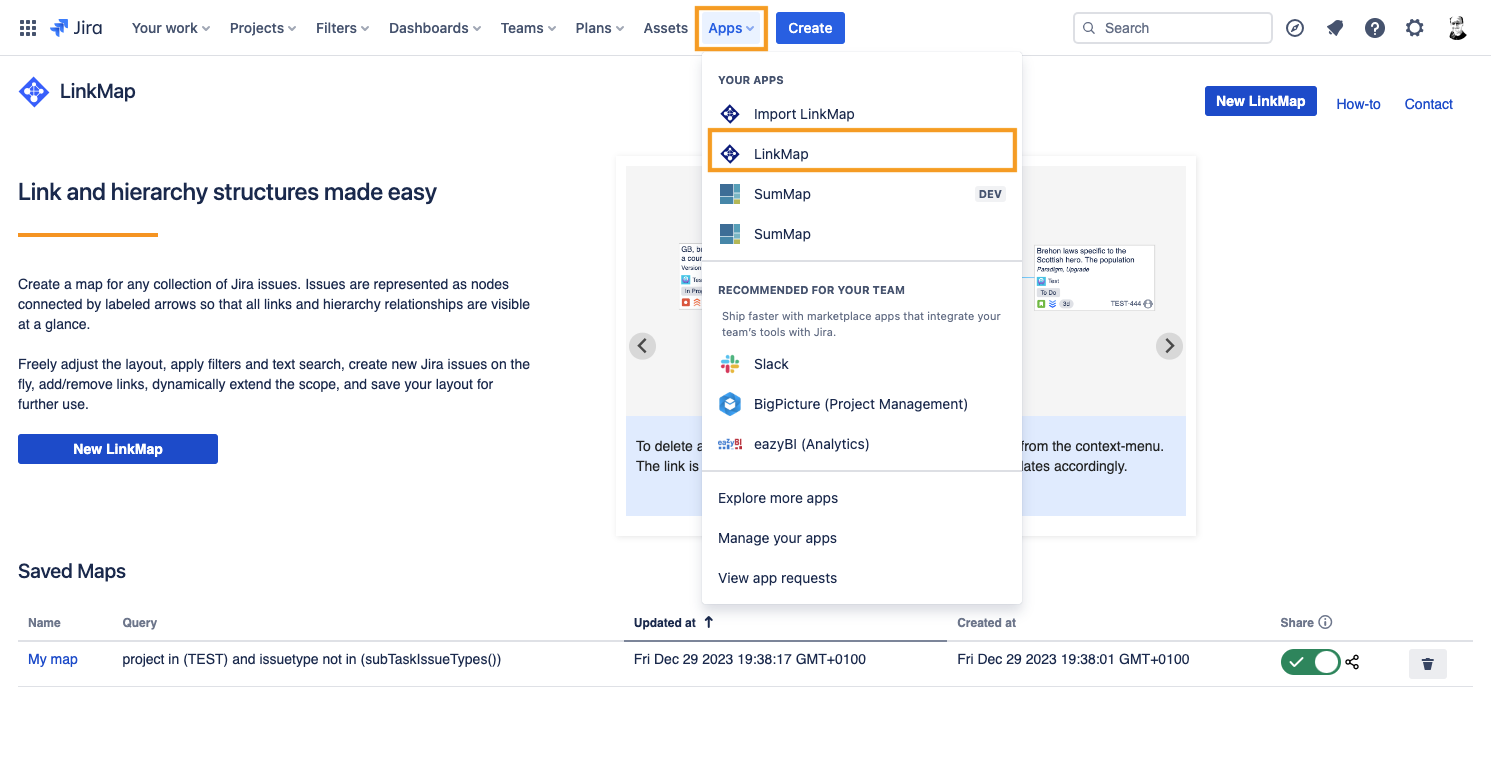
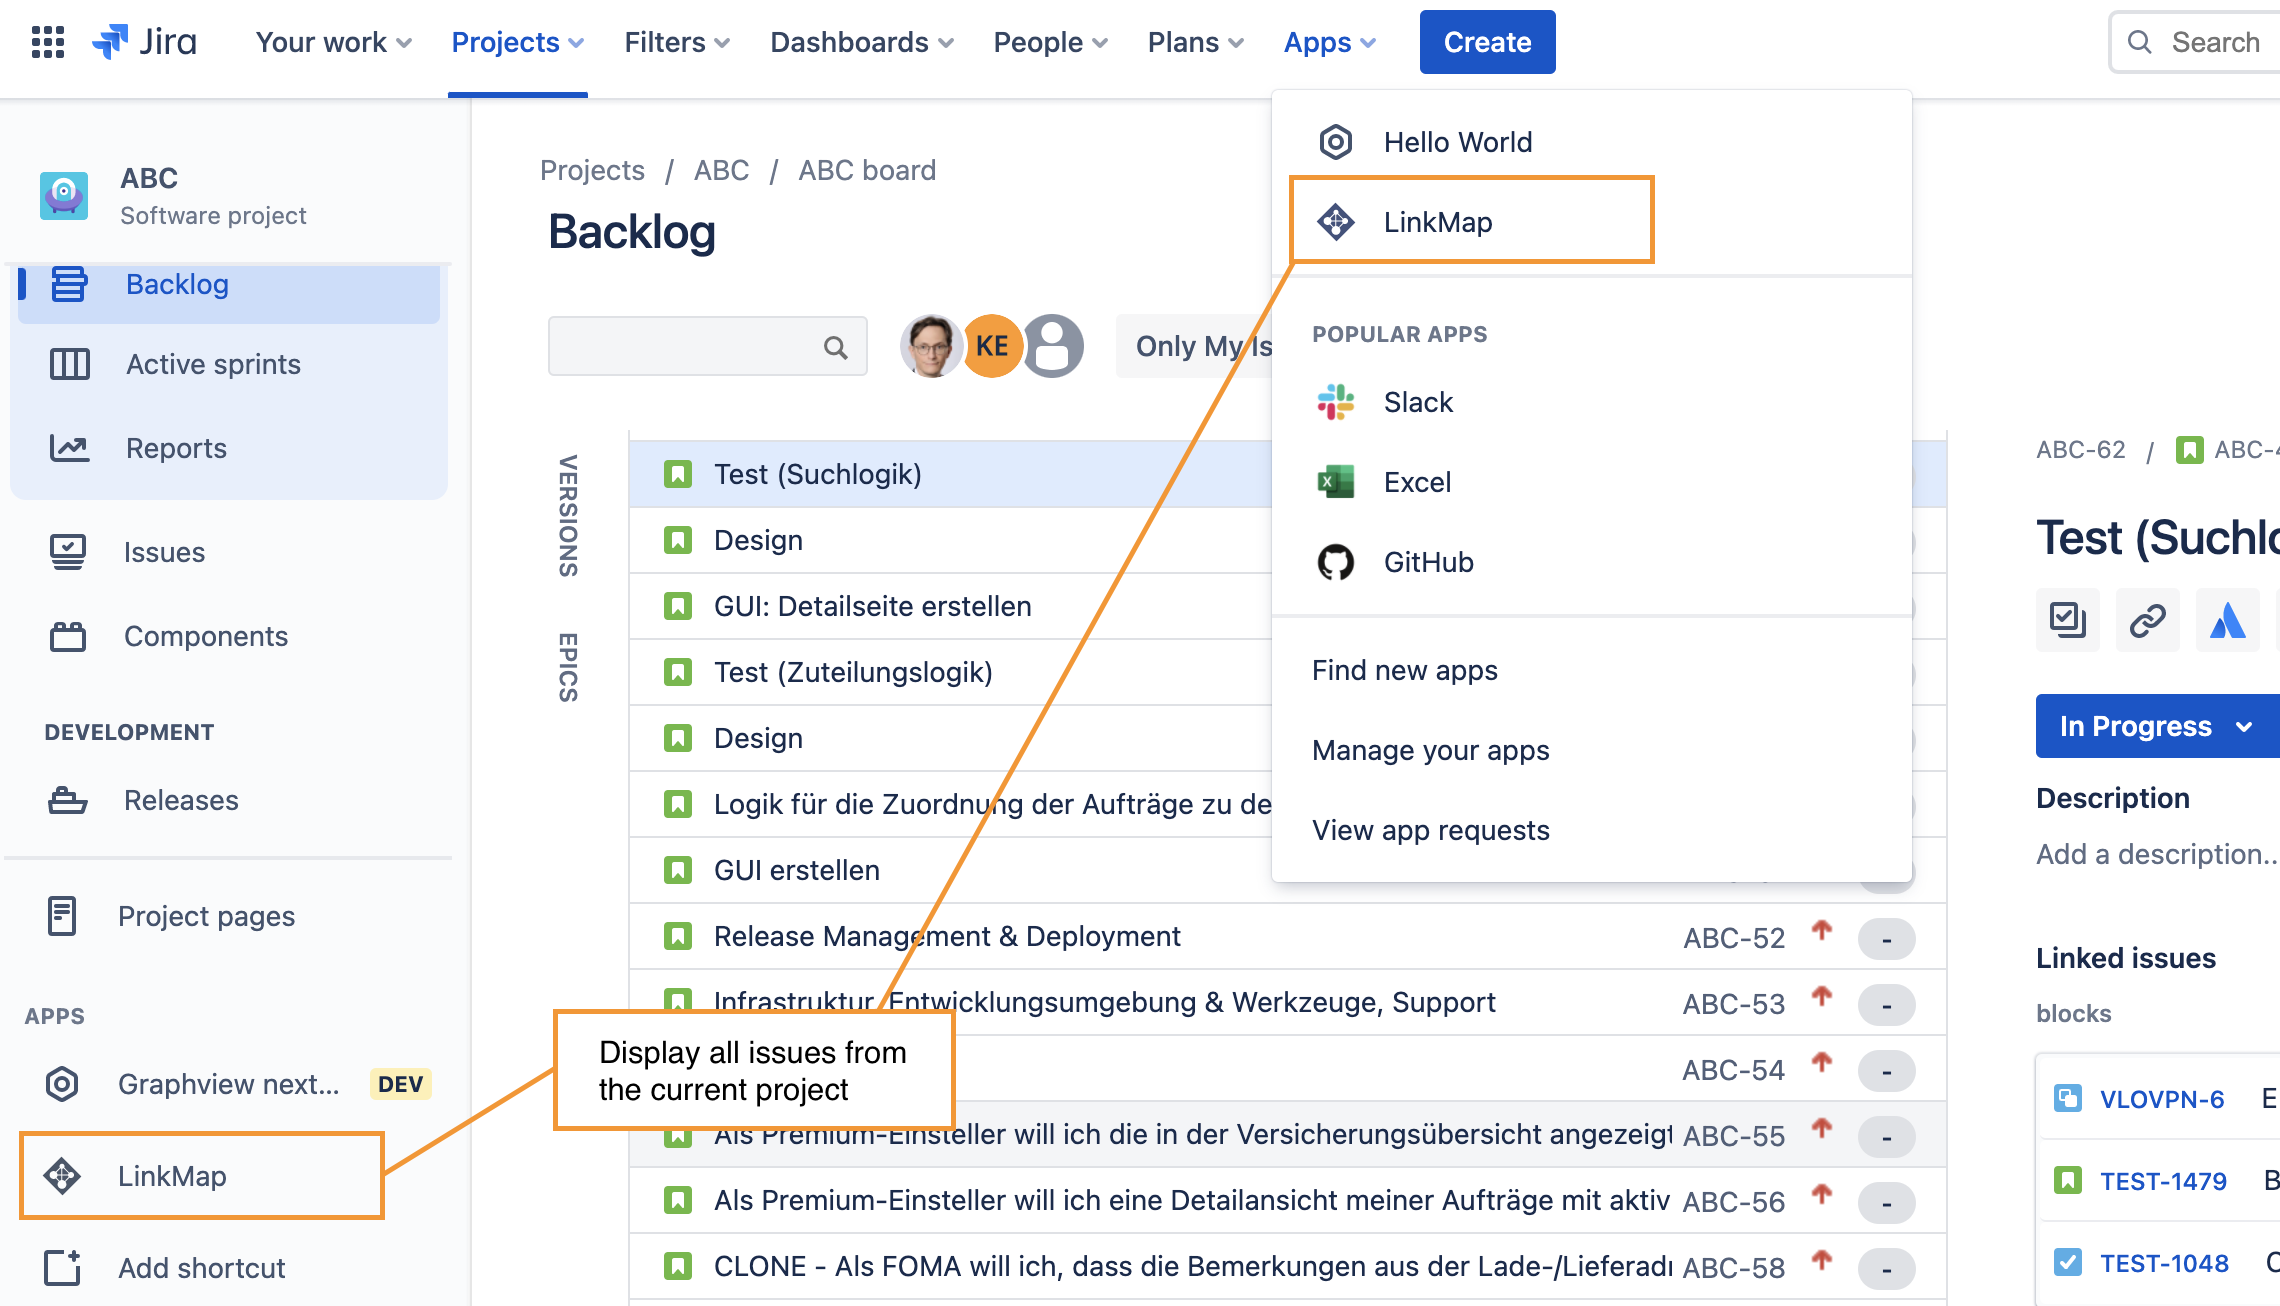
Starting LinkMap
To access LinkMap, navigate through the main menu in the App. This will open the LinkMap start page, providing an overview of your saved maps.
To create a new map, simply click the "New LinkMap" button. This will bring up an overlay where you can choose one or more projects for visualization. Additionally, you can select specific fields to display for each issue. By default, sub-tasks and issues marked as done are excluded, but you can override this by adjusting the corresponding checkboxes.
Additionally, you can configure the link direction to display relationships as either active (e.g., "blocks") or passive (e.g., "is blocked by").
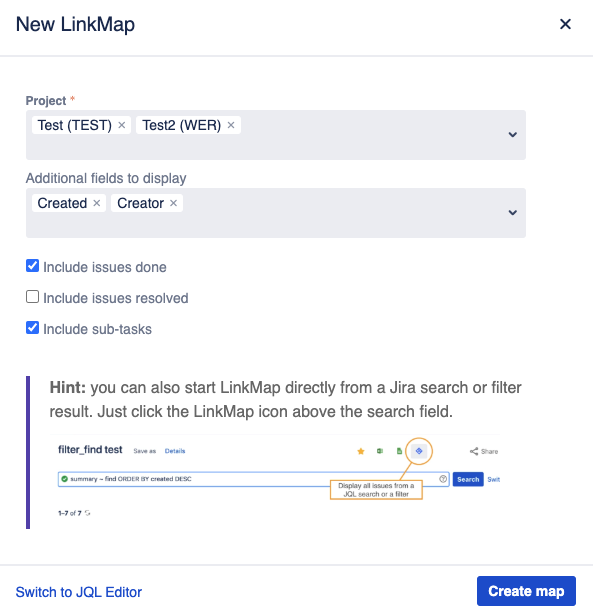
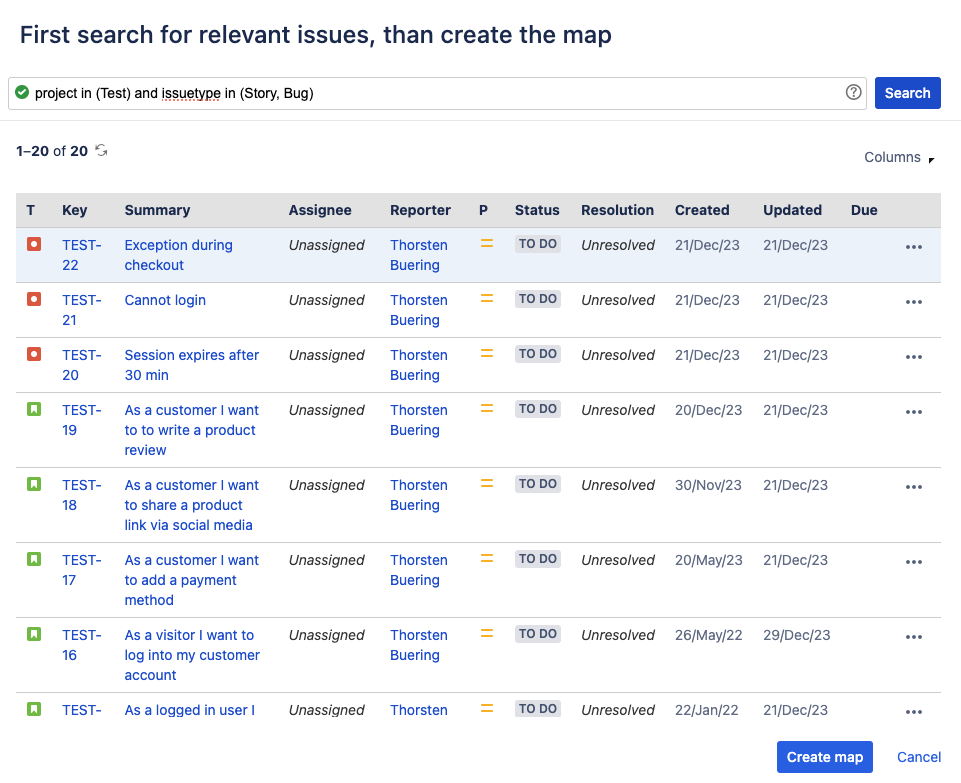
For a more precise issue selection, access the JQL Editor by clicking the "Write a custom query" link at the bottom of the overlay. Here, you can input any JQL query and execute the search. Once satisfied with the results, click "Create Map" to transform the search outcome into a LinkMap visualization.
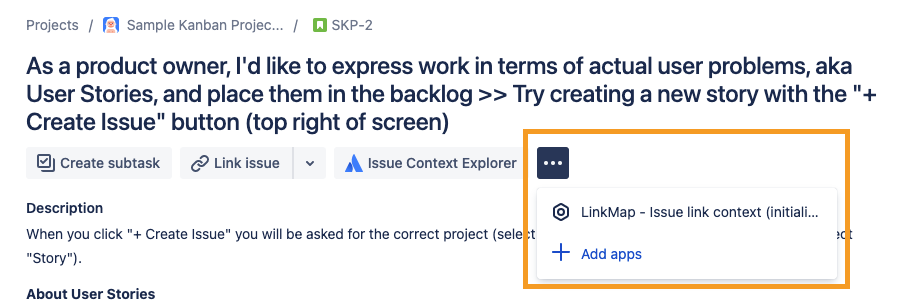
Creating a Map from an Issue Context
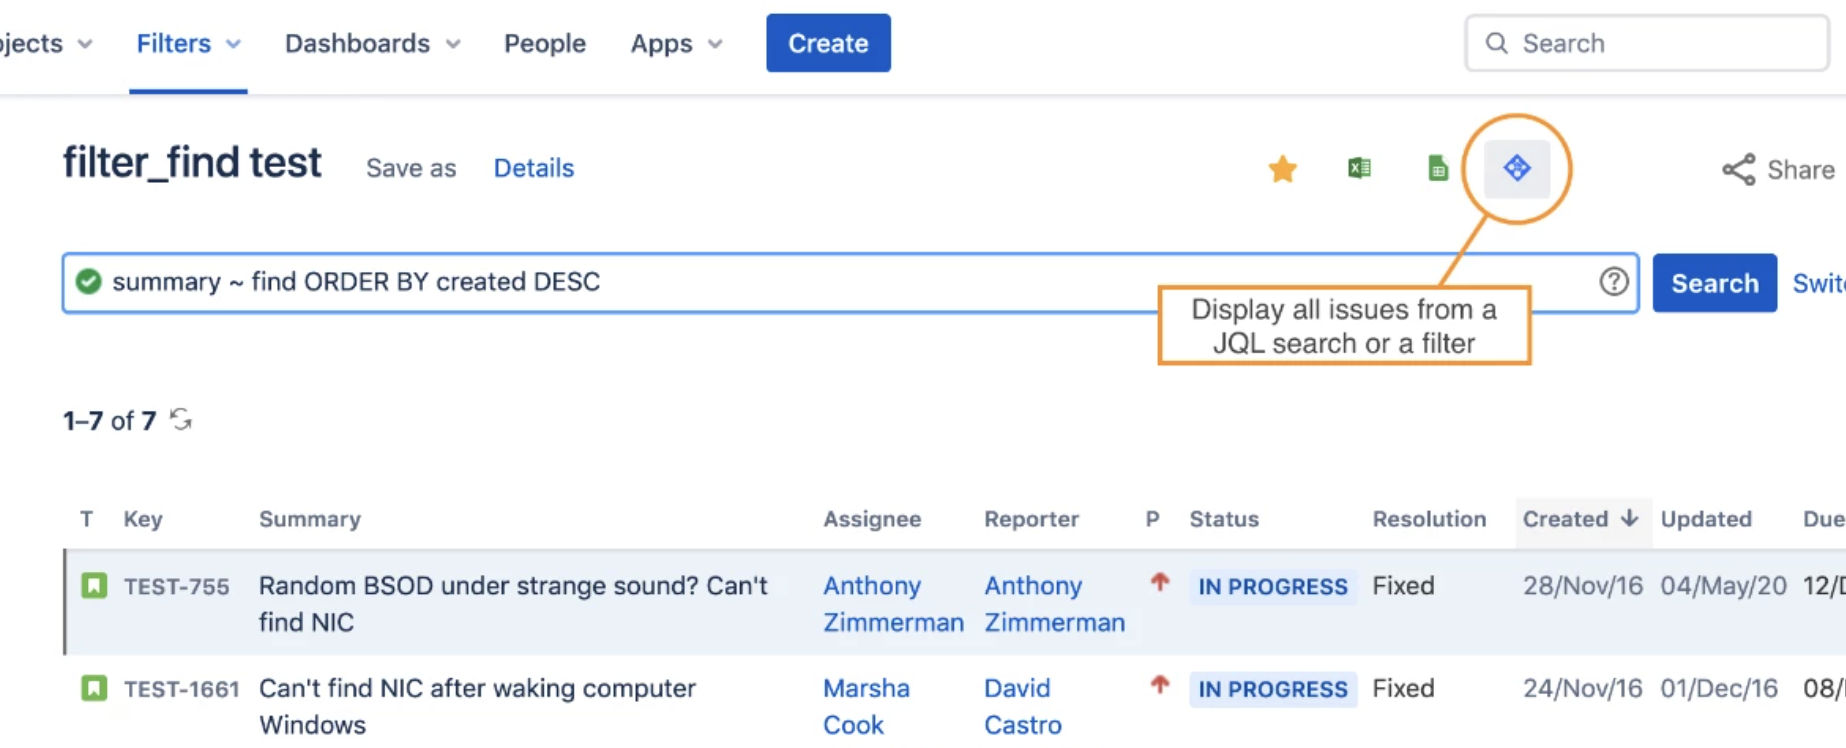
There are alternative methods to initiate LinkMap: either from the outcomes of a Jira-internal search (including filters) or via the left-side menu within a project. In both scenarios, the graph immediately visualizes the given issue context.
Embedding LinkMap into Issue Detail View
Enable LinkMap to seamlessly integrate link context within the standard issue detail view. By default, it retrieves links up to three levels deep, but you can adjust this — as well as the link direction — in the settings dialog. Additionally, the link structure can be dynamically expanded, as explained later.
Understanding the Visualization
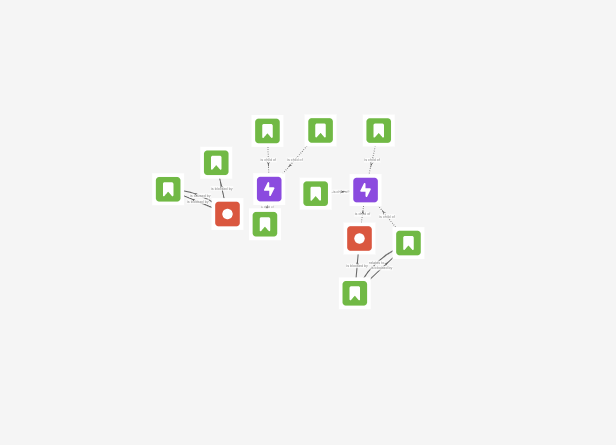
LinkMap effortlessly handles loading and displaying several thousand issues simultaneously, each represented as nodes. When zoomed out, these nodes appear as familiar Jira issue type icons.
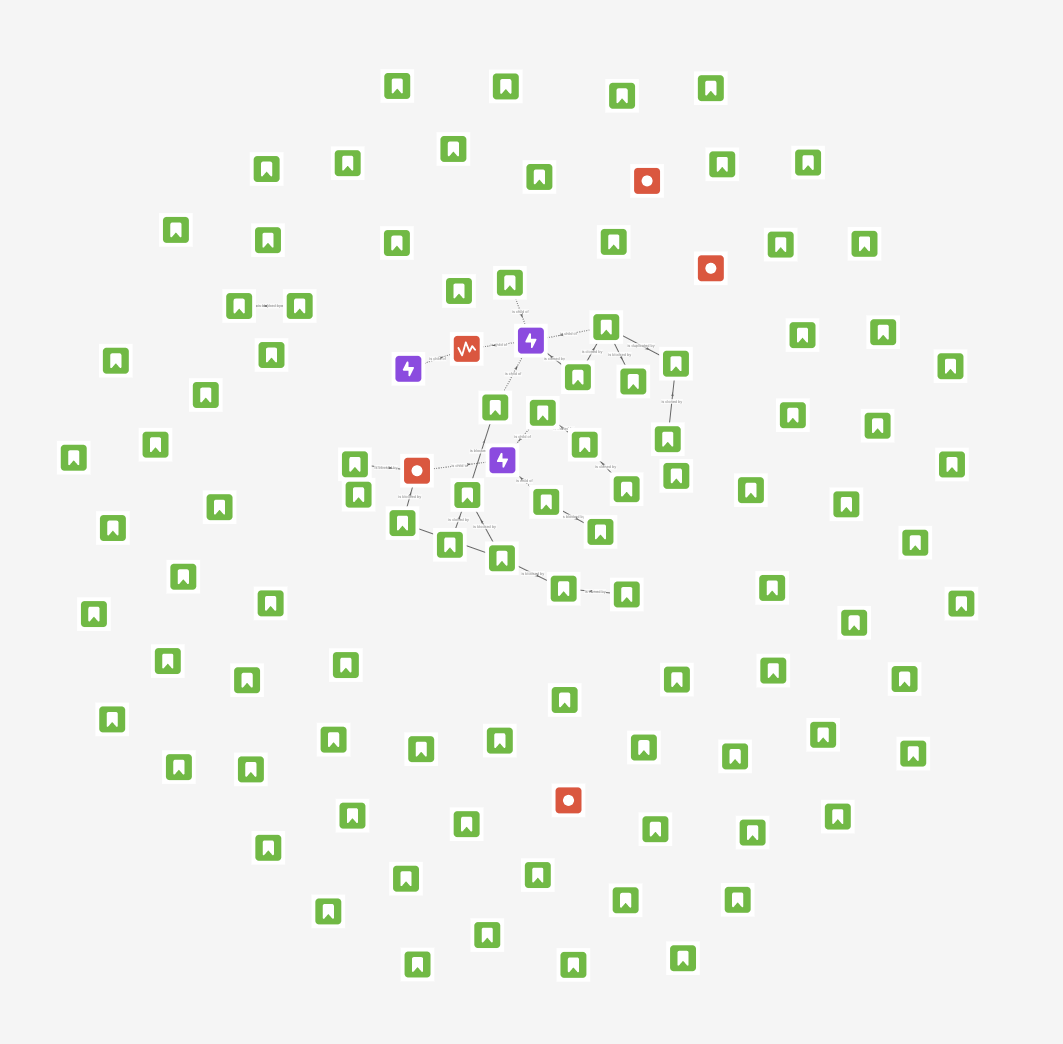
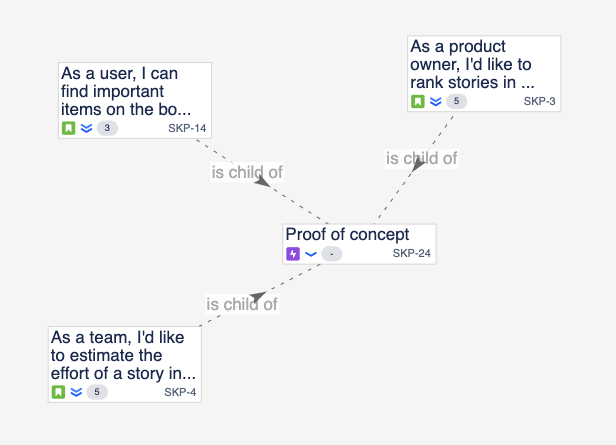
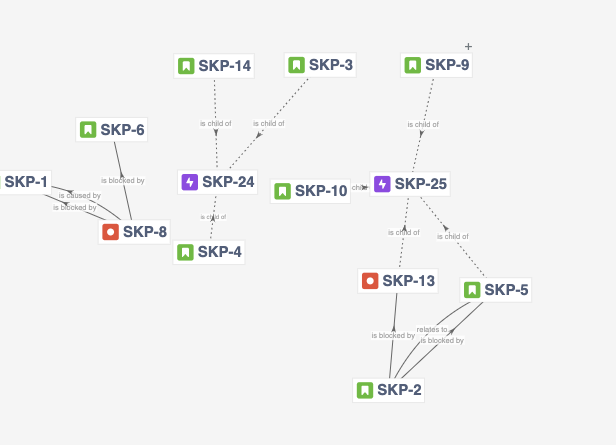
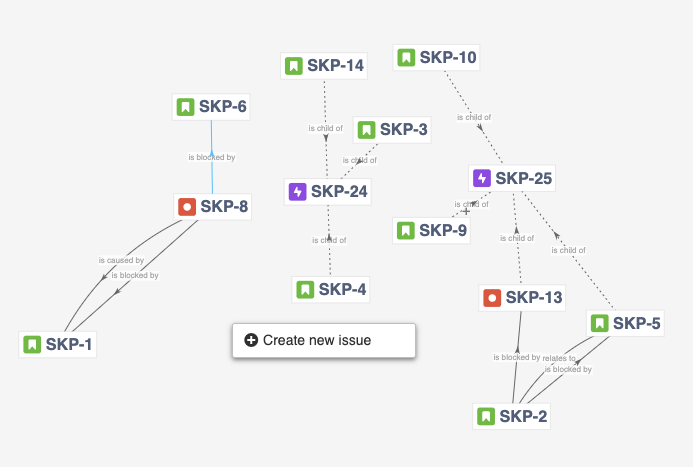
Connections between issues are illustrated as edges linking the nodes. For directed link types like 'is blocked by', an arrowhead points towards the issue causing the blockage. Each link is labeled with its respective link type.
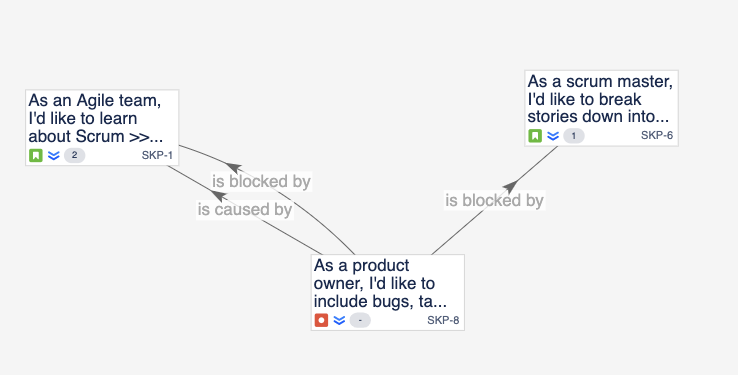
Relationships such as parent-child associations, such as between epics and stories or stories and sub-tasks, are also depicted as edges but marked with dashed lines.
The layout is optimized to minimize overlaps through a force-directed simulation.
Note: By default, issues without links are hidden. To display them, uncheck the "Hide issues without links" option in the control panel.
Navigating & Accessing Issue Details
Navigate the issue space by zooming (using the mouse wheel or trackpad gesture) and panning (dragging the stage). Issues can be repositioned freely through drag-and-drop.
To select and reposition multiple issues simultaneously, hold down the Shift key to select multiple issues by either single-clicking them or using the lasso tool (click and drag the mouse on the canvas to draw a selection area). Once selected, you can drag the group of issues to a new position.
To select connected issues, right-click on an issue and choose "Select issues and neighbors" from the context menu.
When zooming in, issues increase in size and evolve their appearance to gradually reveal more comprehensive information.
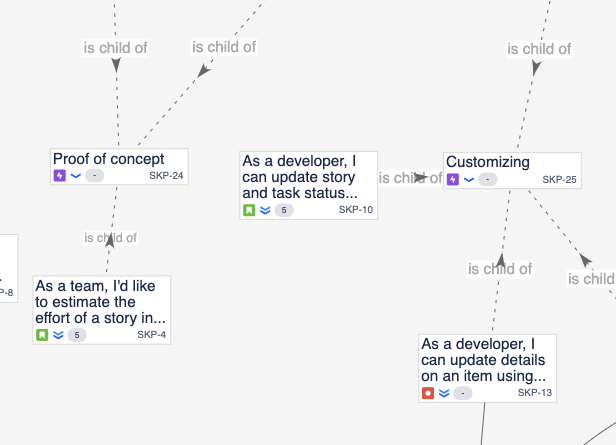
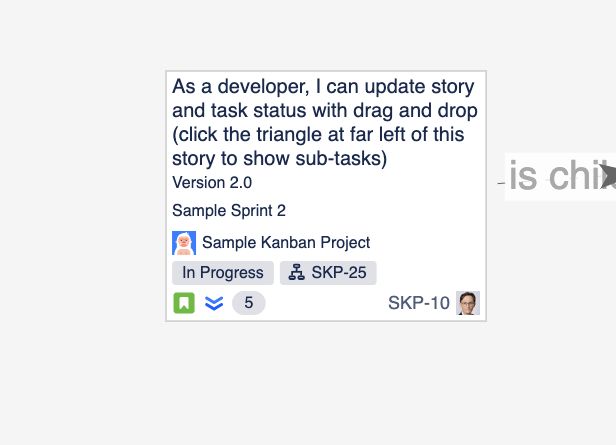
In addition to the issue key and summary (and any individual fields selected in the "New LinkMap" dialog), all standard attributes are displayed (mirrored by filter attributes on the control panel). If an estimate is available, the aggregated time-to-finish is shown; otherwise, story points are provided.
To access issue details while zoomed out, hover the mouse over a node. This action triggers a tooltip containing the key and summary of the respective issue. Additionally, to clarify the link structure, the issue along with all directly connected nodes is highlighted.
Searching
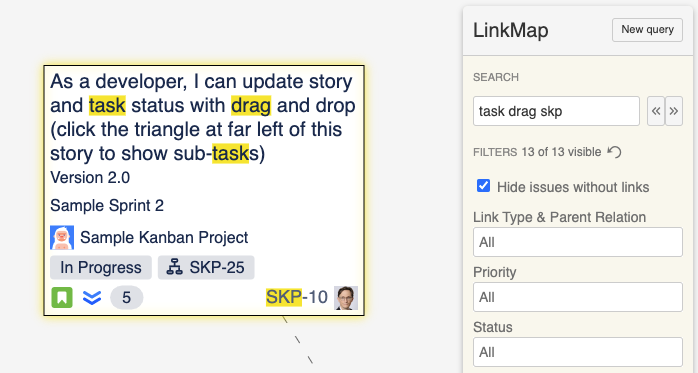
Use the search field to enter keywords for finding issue keys and/or summaries. Upon entering keywords, the app automatically zooms in on the first matching issue. The matched keywords are highlighted. Navigate through all matching issues by pressing the Enter key or clicking the arrow buttons.
Reset the search by clearing the content from the search field or by clicking the 'x' icon.
Filtering
Use the control panel to select one or multiple filter values from the dropdown menus. Issues that don't match all selected filter values across all filter attributes will be instantly hidden.
Remove a specific filter value by clicking the 'x' button next to its label. Clear all filters by clicking the reset icon button.
For filtering links, utilize the 'Link type & parent relation' filter. If the 'Hide issues without links' option is enabled, nodes lacking links to other issues will be instantly hidden.
Switch the link direction by selecting either 'linked by →' (default) or 'links →'.

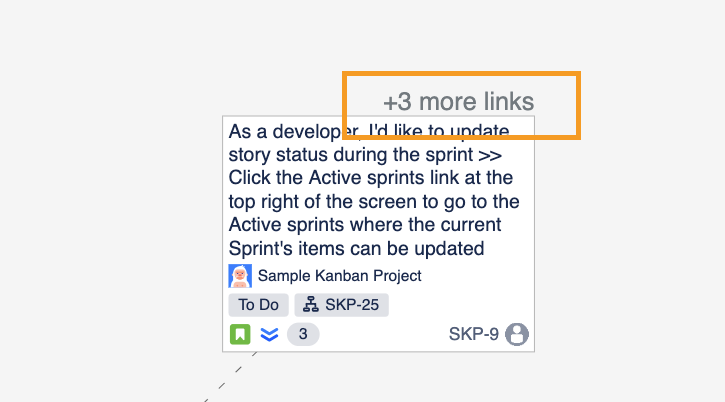
Loading Additional Links
Issues that have links to other issues beyond the current view are indicated with a '+' sign. To load these additional links and update the visualization, right-click on an issue and select 'Load all links' from the context menu. Note: This action does not load additional parent/child relationships as they are not standard links. However, you can override this behavior through a corresponding settings option.
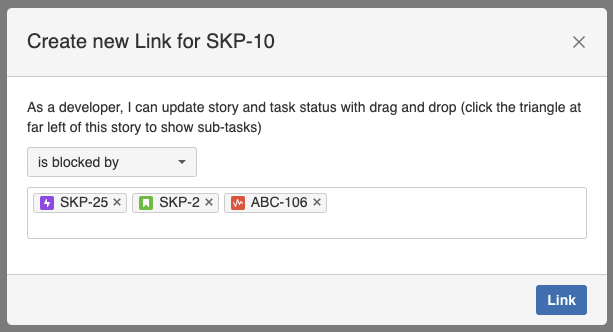
Adding a New Link
To create a new link:
- Right-click on the issue
- Select 'Add new link' from the context menu
- In the pop-up window, choose the link type, select one or more link targets (via key and content search), and click the "Link" button
Subsequently, the links are created in Jira, and the visualization updates accordingly. If the link targets were not initially present, they are loaded and added to the graph.
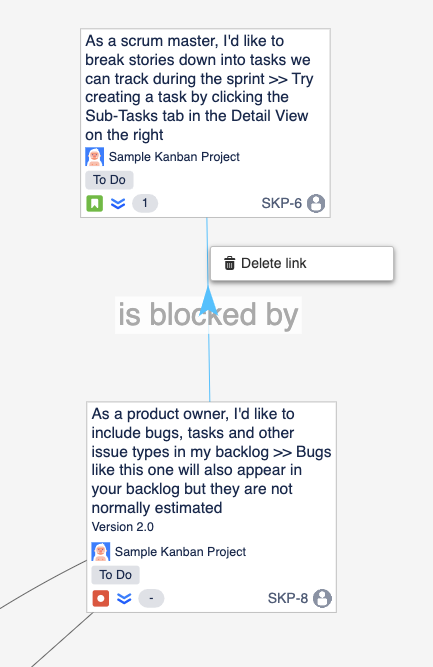
Deleting a Link
To delete an existing link:
- Right-click on the link
- Select 'Delete link' from the context menu
Consequently, the link is deleted from Jira, and the visualization updates accordingly.
Note: This function does not apply to parent/child relationships (dashed lines).
Creating a New Issue
To create a new issue:
- Right-click on an empty space (not an issue)
- Select 'Create new issue' from the context menu
- Enter the issue data into the standard Jira dialog and click 'Create'
- The new issue is created and added to the visualization along with its links (if any)
Note: Due to the current filter settings, the new issue might be hidden. In such cases, the app displays an alert.
Creating a label
Easily add labels to name your clusters. Simply right-click on the canvas and choose the label action from the context menu. Right-clicking on a label allows you to edit or delete it.

Settings
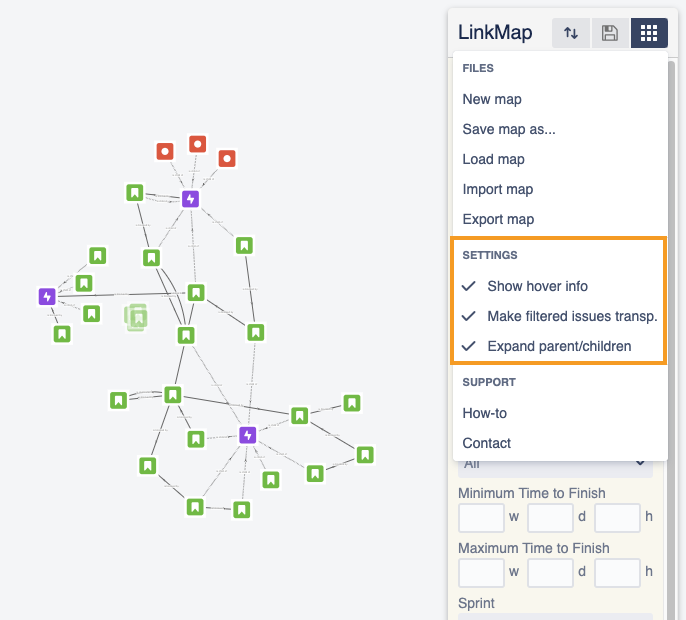
Access settings through the burger menu:
- Show hover info: toggle the tooltip displayed when hovering over issues
- Make filtered issues transparent: adjust visibility for filtered issues by making them semi-transparent instead of hiding them
- Expand parent/children: load not only additional links but also parent/children relationships on demand. Click on an issue to verify if such relationships exist.
Preserving Layouts
Save a map by clicking the respective icon button or selecting "Save map as..." from the burger menu. A map comprises the query, a list of additionally loaded issues, issue positions on the map, and all settings and filter values. To load a previously saved map, use the "Load map" function from the burger menu (or click on "Apps/LinkMap" in the top navigation bar).
Alternatively, export and save a map file to your computer through the "Export map" command in the burger menu. To load such a file, use the "Import" function, which prompts you to select the respective file from your hard drive.
Sharing Maps
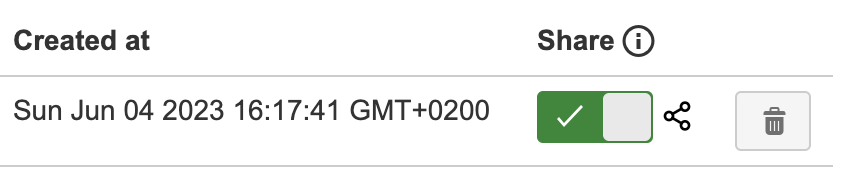
To share a map, toggle the share button in the "Saved Maps" list, then click the share icon to reveal and copy the link. Share the link with individuals within your Jira subscription. While sharing is activated, individuals with the link can access, but not delete the map.
You can easily toggle the edit permissions for a shared map by clicking the lock icon. If the map is locked, other users can still view it, but they will not be able to save any changes. By default, a shared map is locked, ensuring that only the owner can make edits.
Delete Maps
Permanently delete a map by clicking the delete button in the "Saved Maps" list for the respective map. Note: this action cannot be undone.
Missing a feature or found a bug? Just let us know! We are curious to learn how you use the app and what could be improved.